 Diesen Artikel auf Deutsch lesen
In this article you will learn everything about using Komfortkasse with PrestaShop.
Read the article Getting started: Setting up and connecting to the shop beforehand.
Installing the Komfortkasse module for PrestaShop
In PrestaShop Back Office, go to Modules and Services.
Make sure you filter by Installed & Not Installed and Enabled & Disabled. Enter Komfortkasse in the search field.
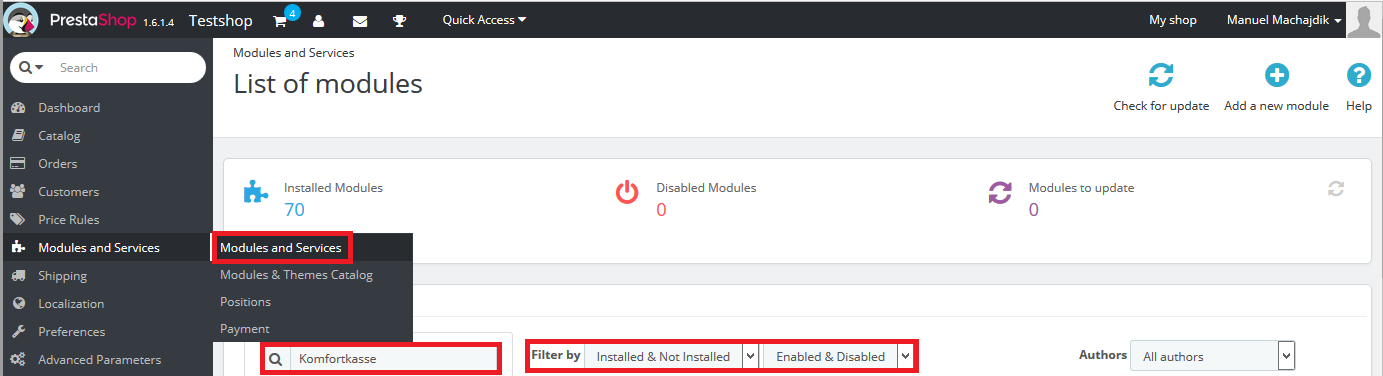
In the Search results, look for the Komfortkasse module and select Install.
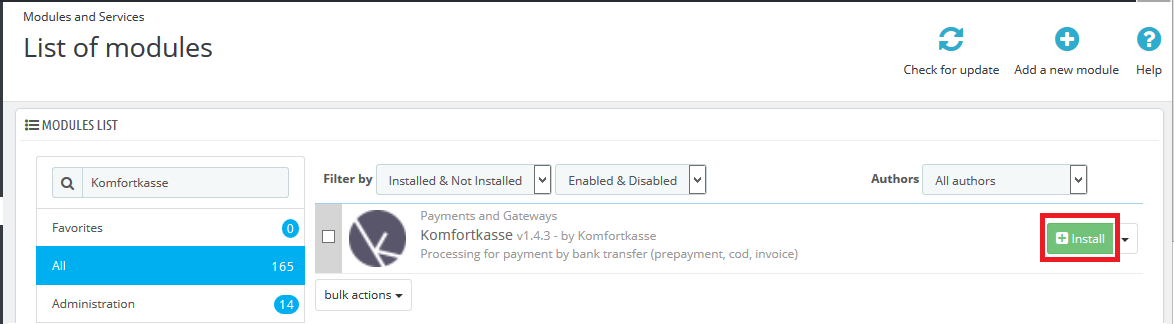
If you downloaded the module directly from Komfortkasse, confirm the warning that the module can not be verified.
You will now see a message that the module has been installed successfully and will be redirected to the Settings page.
Configuration of the Komfortkasse module for PrestaShop
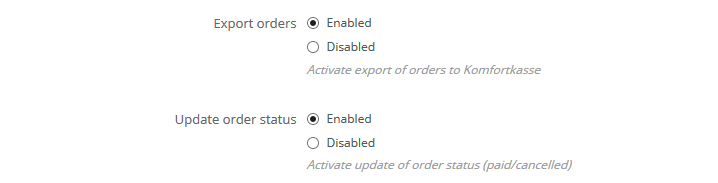
Make sure that Export orders and Update order status are enabled.
Now, choose the settings for the three payment types supported by Komfortkasse: Prepayment, Invoice and COD.
1. Prepayment settings
Select the payment method(s) that you use for prepayment. Normally, this will be Bank wire (German: Banküberweisung).

Select the order statuses that a bank wire order is considered "open". Normally, this will be Awaiting bank wire payment (German: Warten auf Zahlungseingang von Bank).

Select the order statuses you want to be set when payment for an order is received. Normally, this will be Payment received.

Select the order status you want to be set when the order gets cancelled because no payment is received. Normally, this will be Order cancelled.

2. Invoice settings
For invoice (and COD), payment will be received after shipping. In a default PrestaShop installation, there are no order statuses that represent an order that has been shipped and afterwards paid. Therefore, we recommend to add two extra statuses: one for shipped and paid orders, and one for orders that have been shipped but have never been paid.

Now. get back to the module settings.
Select the payment method(s) that you use for invoice. In a default PrestaShop installation, no such payment method exists, you will have to install a module like this one.

Select the order statuses that an invoice order is considered "open". Normally, this will be Shipped and/or Dispatched.

Select the order status you want to be set when the payment is received. This will be one of the statuses that we created before.

Select the order status you want to be set when no payment is received. This will be the other one of the statuses that we created before. These orders might be written off or given to a debt collection agency.

3. Cash on delivery (COD) settings
For COD (and invoice), payment will be received after shipping. In a default PrestaShop installation, there are no order statuses that represent an order that has been shipped and afterwards paid. Therefore, we recommend to add two extra statuses: one for shipped and paid orders, and one for orders that have been shipped but have never been paid.
Now. get back to the module settings.
Select the payment method(s) that you use for COD. Normally, this will be Cash on delivery.

Select the order statuses that a COD order is considered "open". Normally, this will be Shipped and/or Dispatched.

Select the order status you want to be set when the payment from the shipping company is received. This will be one of the statuses that we created before.

Select the order status you want to be set when no payment is received from the shipping company. This will be one of the status that we created before. These order will need manual treatment (maybe the order never got delivered, or the shipping company messed something up with the payment).

That's it! Do not change the other settings (encryption and keys). These will be set automatically upon connecting your shop.
Connecting the connection
If all settings are fully specified in the Komfortkasse Magento extension, the shop can be set up in Komfortkasse.
Log in to the Komfortkasse merchant area and select "Magento" as the shop system. Enter the URL of the shop and save the data.
Then select the actions Connect in the actions menu ≡.
Activate prepayment in PrestaShop
To be able to use Komfortkasse, you must activate payments in advance in PrestaShop. If you already offer prepayment in your shop, you can skip this step. If you are installing PrestaShop for the first time, prepayment is usually already activated by default.
Log in to the PrestaShop backend and open Modules - Payments. Select the Activate link in the list under Bank transfer (if the payment method is not yet installed, select Install first):

You have now activated prepayment in your shop.
Deactivating the sending of Payment information in PrestaShop
Normally, your customers will receive the Payment information directly from Komfortkasse. If you already offer prepayment, you have probably already configured your shop so that your customers receive your Bank details. You should now deactivate this sending (unless you want Payment information to continue to be sent directly from the shop and not from Komfortkasse).
Log in to the PrestaShop backend and open Modules - Payments. Select the Settings link next to Bank transfer:

Specify an explanatory text instead of the bank details, e.g. "You will receive the Bank details in another e-mail" or similar:

Save the data by clicking on Save.
Note for experienced users: Alternatively, you can completely deactivate the sending of e-mails from PrestaShop. To do this, open the corresponding order status (e.g. "Waiting for payment receipt") (under Shop settings - Orders - Status) and deactivate the "Send e-mail to customers when status changes" checkbox.